Meta Description: Learn how to make the best cinnamon raisin pumpkin scones. This easy, cozy recipe is perfect for fall baking and makes a delicious breakfast or snack. Get our tips for a flaky texture and incredible flavor.
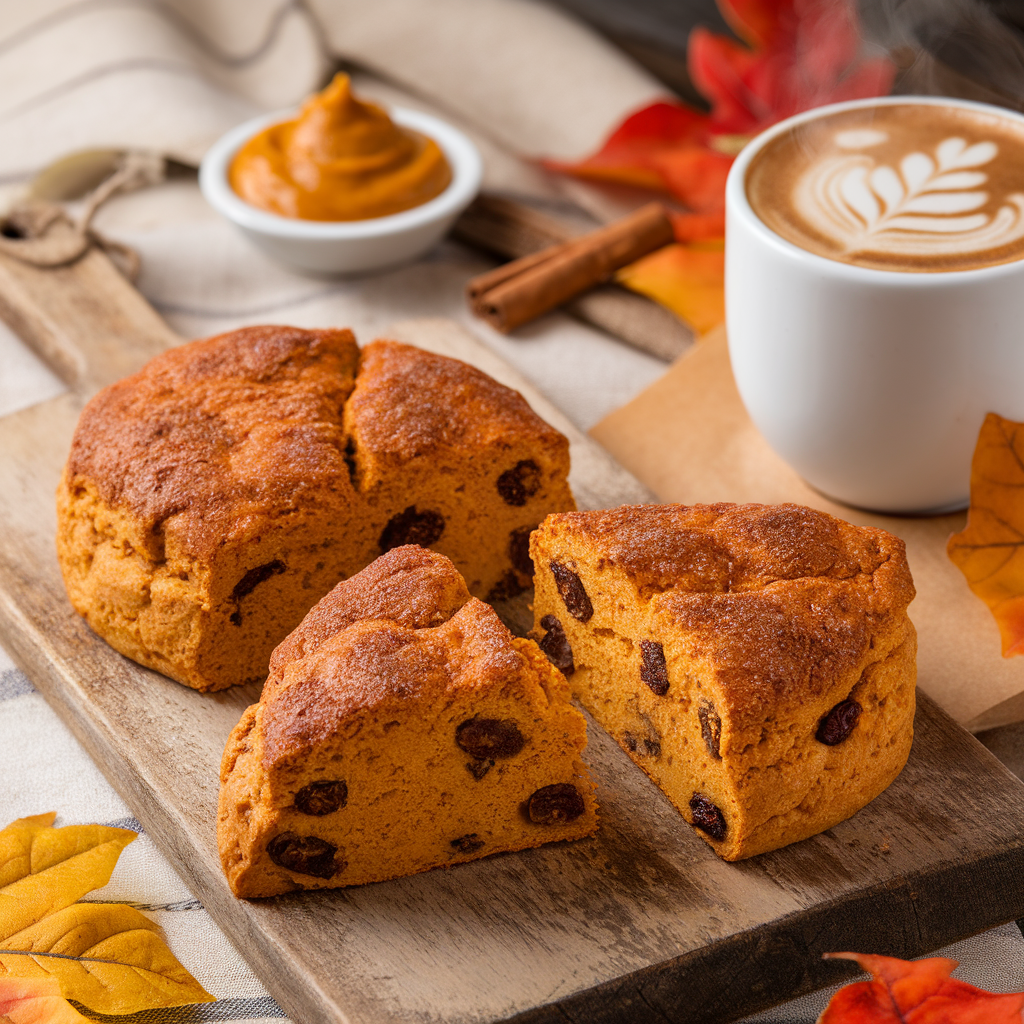
🍂 Why You’ll Adore These Cinnamon Raisin Pumpkin Scones
There are certain smells that just instantly transport you, and for me, the aroma of cinnamon and pumpkin baking in the oven is a one-way ticket to cozy fall evenings. It takes me back to my grandmother’s kitchen, a place where a cup of tea and a warm treat could fix just about anything. I remember one crisp autumn afternoon, we decided to try making scones, and I was in charge of adding the raisins. I might have been a little too enthusiastic, because they came out looking more like raisin-and-cinnamon-chip cookies than actual scones. We laughed about it for a long time, but those imperfect, delicious little treats were a lesson in one of my favorite things about baking: it doesn’t have to be perfect to be perfectly wonderful.
These cinnamon raisin pumpkin scones are my grown-up, refined version of that memory. They capture all the best parts of the season—the warm spices, the rich pumpkin flavor, and the comforting sweetness of raisins—in a flaky, tender package. Unlike some scones that can be dry or bland, this recipe is designed to be moist and full of flavor. The pumpkin puree adds a subtle earthy sweetness and keeps the crumb incredibly tender, while the cinnamon and other spices make every bite feel like a warm hug. It’s the kind of treat that feels just right with a hot cup of coffee or tea on a chilly morning, or as a delightful snack in the afternoon.
What I love most is how simple they are. You don’t need any fancy equipment or advanced baking skills. It’s all about a few key techniques that I’ll walk you through, like keeping your ingredients cold and not overworking the dough. With a little bit of patience and a lot of love, you’ll be pulling a fresh batch of these beautiful golden-brown scones out of the oven in no time.
🎃 The Best Recipe for Cinnamon Raisin Pumpkin Scones
Creating these scones is a delightful process, and the final result is a flaky, tender treat that’s worth every minute. The key to a great scone is a light hand and cold ingredients, so pay close attention to those details!
Prep Time: 20 minutes
Cook Time: 15-18 minutes
Total Time: 35-38 minutes
Yields: 8 large scones
✅ Ingredients for Scones
- 2 cups all-purpose flour
- ⅓ cup granulated sugar
- 2 teaspoons baking powder
- ½ teaspoon baking soda
- ½ teaspoon salt
- 1 ½ teaspoons ground cinnamon
- ½ teaspoon ground ginger
- ¼ teaspoon ground nutmeg
- ⅛ teaspoon ground cloves
- ½ cup unsalted butter, cold and cubed
- ½ cup canned pumpkin puree (not pumpkin pie filling)
- ⅓ cup cold buttermilk
- ½ cup raisins
- For the egg wash: 1 large egg, beaten with 1 tablespoon water
- For the cinnamon sugar topping: 1 tablespoon granulated sugar mixed with ½ teaspoon ground cinnamon
📝 Step-by-Step Baking Instructions
- Prepare your oven and pan: Preheat your oven to 400°F (200°C). Line a baking sheet with parchment paper. This helps prevent sticking and makes for easy cleanup.
- Combine the dry ingredients: In a large bowl, whisk together the flour, sugar, baking powder, baking soda, salt, and all of the spices (cinnamon, ginger, nutmeg, and cloves). Make sure everything is well combined. This ensures an even rise and flavor throughout the scones.
- Cut in the butter: Add the cold, cubed butter to the dry ingredients. Using a pastry blender, two knives, or your fingertips, cut the butter into the flour mixture until it resembles coarse crumbs, with some pieces of butter still about the size of small peas. This is a crucial step! Those little pockets of butter will create the flaky layers we all love in a good scone.
- Add the wet ingredients: In a separate, small bowl, whisk together the pumpkin puree and cold buttermilk. Pour this mixture into the flour and butter mixture. Use a spatula to gently fold everything together until just combined. The dough will be shaggy and a little sticky, and that’s perfectly fine. Do not overmix! Overmixing will develop the gluten and result in tough, dense scones.
- Fold in the raisins: Gently fold the raisins into the dough. Again, be careful not to overwork it. Just a few folds until the raisins are evenly distributed.
- Shape the dough: Turn the dough out onto a lightly floured surface. Pat it into a large circle, about 1-inch thick. Using a sharp knife or a bench scraper, cut the circle into 8 wedges, like a pie. For a more rustic look, you can also use a biscuit cutter.
- Place and glaze: Carefully transfer the scones to your prepared baking sheet, leaving about 2 inches between each one. Brush the tops of the scones with the egg wash and then sprinkle generously with the cinnamon sugar topping.
- Bake to perfection: Bake for 15-18 minutes, or until the tops are golden brown and a toothpick inserted into the center comes out clean. The timing can vary depending on your oven, so keep an eye on them.
- Cool and serve: Let the scones cool on the baking sheet for a few minutes before transferring them to a wire rack. They are best served warm, either on their own or with a simple glaze or a pat of butter.
🌟 Pro Tips and Delicious Variations
Secrets to Scone Success
- Keep it cold: This is the most important rule of scone making. Using cold butter, cold buttermilk, and even cold hands helps create those wonderful, flaky layers. I sometimes even put my flour in the freezer for a few minutes before starting!
- Don’t overmix: This is the second-most important rule. Overworking the dough will activate the gluten, leading to a tough, bready texture instead of a light, tender one. Mix just until the dough comes together.
- The right kind of pumpkin: Be sure to use 100% pure canned pumpkin puree, not the pumpkin pie filling that is pre-sweetened and spiced. The latter will throw off the recipe’s balance.
Creative Ways to Switch Things Up
- Change the mix-ins: If raisins aren’t your thing, feel free to swap them out. Dried cranberries, white chocolate chips, or chopped pecans would all be delicious additions. You could also use a combination for a unique twist.
- Add a glaze: For a sweeter scone, you can make a simple glaze. Whisk together 1 cup of powdered sugar with 2-3 tablespoons of milk or a little more pumpkin puree until you have a smooth, drizzlable consistency. Drizzle it over the cooled scones.
- Make them savory: Scones aren’t just for sweet treats! Omit the sugar, spices, and raisins and add some sharp cheddar cheese, chives, and black pepper for a savory version perfect for a cheese board.
❓ Scone-Making FAQs
It’s completely normal to have a few questions when trying a new baking recipe. Here are some of the most common ones I hear about scones.
Why is cold butter so important?
When you bake scones, the cold chunks of butter in the dough create steam as they melt. This steam pushes the layers of dough apart, which is what gives a scone its signature light and flaky texture. If the butter is too soft, it will combine with the flour and liquid, creating a cake-like texture instead of a flaky one.
Can I use milk instead of buttermilk?
Yes, you can. However, buttermilk contains lactic acid which reacts with the baking soda to give the scones a better rise and a more tender crumb. To make a simple buttermilk substitute, stir 1 tablespoon of lemon juice or white vinegar into a liquid measuring cup, then add enough milk to reach ⅓ cup. Let it sit for about 5 minutes until it curdles slightly before using.
How do I store leftover scones?
These scones are best on the day they are baked. However, you can store them in an airtight container at room temperature for up to 3 days. To reheat them, just pop them in a 350°F (175°C) oven for a few minutes until they are warm and the crust is crisp again.
Can I freeze the dough?
Absolutely! You can cut the unbaked scones and place them on a parchment-lined baking sheet in the freezer until they are solid. Then, transfer them to a freezer bag or airtight container. When you’re ready to bake, you can bake them directly from frozen—just add a few extra minutes to the baking time. This is a great tip for having fresh, warm scones ready whenever a craving hits!
📊 Nutritional Information
| Nutrient | Amount per serving* |
| Calories | 310 |
| Protein | 6 g |
| Fat | 14 g |
| Saturated Fat | 8 g |
| Carbohydrates | 41 g |
| Sodium | 350 mg |
| Fiber | 2 g |
| Sugar | 16 g |
*Note: Nutritional values are approximate and may vary based on ingredients and serving size.
🎉 A Taste of Autumn Comfort
Baking these cinnamon raisin pumpkin scones is more than just following a recipe; it’s an experience. It’s about taking the time to create something delicious, filling your home with a wonderful aroma, and sharing a moment of comfort with those you love. The combination of warm spices and sweet raisins with the subtle, earthy flavor of pumpkin is a classic for a reason, and I hope this recipe helps you create a new favorite tradition in your own kitchen. Whether you’re an experienced baker or just starting out, this recipe is designed to be a success, giving you a tender, flaky, and unbelievably flavorful scone every time.
So, roll up your sleeves, grab your ingredients, and get ready to enjoy a little piece of fall heaven. I promise you, that first warm bite, with its soft texture and burst of spice, will make you so glad you did. And once you’ve made them, don’t be shy! I would absolutely love to hear about your experience. Feel free to share your thoughts, photos, or any of your own unique variations. Happy baking! 😋