Are you ready to bake a loaf of bread that is so light and airy, it practically floats? I was, too. For years, I struggled with heavy, dense loaves, convinced that the Italian Ciabatta Bread I loved—with its impossibly open crumb and crisp crust—was magic I couldn’t replicate. Ciabatta, which charmingly means “slipper” in Italian (you can see why, right?), looks deceptively simple, but it demands respect for hydration and time.1
I’m here to tell you that mastering Ciabatta is absolutely achievable. It requires patience, minimal kneading, and a whole lot of water. The resulting bread is perfect for sandwiches, soaking up olive oil, or just tearing apart at the dinner table. Nothing beats the sound of that thin, crisp crust giving way to a custardy, bubbly interior. I love how the high hydration creates those famous big, irregular holes. Ready to ditch the aggressive kneading and learn the secrets to the ultimate Italian slipper bread? Andiamo a impastare! (Let’s start kneading!)
💧 The High-Hydration Challenge: Ingredients for 2 Loaves
The key to Ciabatta Bread is its high water content, often pushing past 80% hydration.2 This makes the dough sticky but guarantees that coveted open, airy crumb. This recipe makes 2 rustic, delicious loaves.
H3: The Core Ingredients
- 3 1/2 cups (450g) Bread Flour (or strong All-Purpose Flour): High protein content is necessary to absorb the high amount of water.3
- 1 3/4 cups (400g) Cold Water: High hydration is crucial! Cold water slows fermentation, which is important for a long, slow rise.
- 1 teaspoon (5g) Fine Sea Salt: Salt controls the fermentation and strengthens the gluten structure.4
- 1 teaspoon (3g) Instant Yeast: Provides the necessary lift.5
🥣 Part I: Building the Biga (Pre-Ferment)
For the best flavor and structure in Italian Ciabatta, we use a Biga, a traditional Italian pre-ferment.6 This step develops flavor and complexity overnight.
H3: Mixing and Resting the Biga
- Combine Biga Ingredients: In a medium bowl, mix 1 cup (125g) of the flour with 1/2 cup (125g) of the cold water and a pinch of the yeast.
- Mix Until Shaggy: Mix it until it forms a thick, shaggy dough. You don’t need to knead it.
- Overnight Rest (The Flavor Secret): Cover the bowl and let the Biga sit at room temperature for 2 hours, then transfer it to the refrigerator for 12 to 18 hours. This slow, cold ferment develops the deep, slightly nutty flavor.
👐 Part II: The Sticky Dough and Minimal Kneading
The next day, we combine the Biga with the remaining ingredients. This dough will be incredibly sticky—it’s supposed to be! Don’t add extra flour; we rely on the stretch and fold technique to build structure.
H3: Final Mix and Wet Rest
- Combine Ingredients: In a large mixing bowl, dissolve the remaining yeast in a little of the remaining cold water. Add the Biga, the rest of the flour, the salt, and the remaining water.
- Mix Until Shaggy: Mix everything together using a wooden spoon or a stand mixer (with the dough hook) on low speed for just 3 minutes until fully combined. The dough will look like a sticky, messy batter.
- Rest: Cover the bowl and let it rest for 30 minutes. This wet rest (autolyse, essentially) allows the water to fully absorb and starts the gluten development.7
H3: Building Strength with Stretch and Folds (Crucial!)
- The Stretch and Fold Method: Perform a series of “stretch and folds.” Wet your hands frequently to prevent sticking. Grab one edge of the dough, gently stretch it up, and fold it over the center. Rotate the bowl 90 degrees and repeat. Complete four full turns.
- Repeat: Repeat the 4-turn stretch and fold every 30 minutes, three times total. The dough will transform from a sticky mess into a slightly stronger, airy mass after each fold. This technique gently builds strength while preserving the big air bubbles.
🌡️ Part III: Bulk Fermentation and Shaping
We let the dough finish its long, slow fermentation, then gently shape it—the key is to be extremely gentle to preserve the large air bubbles.
H3: The Final Fermentation
- Final Rise: After the last stretch and fold, cover the dough and let it ferment at room temperature until it has increased in volume by about 75% and looks very bubbly and jiggly. This usually takes 1.5 to 2 hours (depending on kitchen temperature).
- Prep the Counter: Liberally dust your counter surface with flour (don’t skimp!). This sticky dough needs a landing pad.
H3: Gentle Shaping for Holes
- Turn Out Gently: Carefully, gently scrape the dough out onto the heavily floured surface. Do not punch the dough down! You want to preserve those huge air bubbles.
- Divide and Stretch: Gently cut the dough into two rectangular pieces (about 12 inches long). Do not roll them! Just gently pull and stretch them into a rough, rectangular shape.
- Proof: Transfer the two Ciabatta loaves to a piece of parchment paper heavily dusted with cornmeal or flour. Let them proof for 30 minutes.
💨 Part IV: Baking with Steam for a Crisp Crust
Just like with baguettes, steam is the absolute secret weapon for achieving the thin, crisp crust of Italian Ciabatta Bread.
H3: Preheat and Steam Setup
- Preheat Stone/Steel: Place a baking stone or steel on the center rack and a shallow metal pan on the bottom rack. Preheat the oven to 450°F (230°C) for at least 30 minutes.
- Transfer: Slide the Ciabatta loaves (on the parchment paper) directly onto the preheated baking stone.
- Steam Method (Crucial!): Immediately pour 1 cup of boiling water into the shallow metal pan at the bottom of the oven. The burst of steam is essential for developing the thin, shatteringly crisp crust.
H3: Bake and Cool
- Bake: Bake for 20 to 25 minutes. The loaves are done when they are deep golden brown and sound hollow when tapped on the bottom.
- Cooling (The Hardest Part!): Transfer the loaves to a wire rack. Let them cool for at least 45 minutes. Cutting them too early releases steam and results in a gummy, dense interior. Patience ensures a perfect crumb!
🏆 Troubleshooting: Why Your Ciabatta Was Dense
A flat, dense loaf is the number one failure when baking Italian Ciabatta Bread. If your loaf came out heavy, here is what likely went wrong.
H3: Common Ciabatta Flaws
| Flaw | Probable Cause | Active Solution |
| Flat/Dense Loaf | Over-Handling/Degassing | Be extremely gentle during shaping; ensure you are preserving the air bubbles during the stretch and folds. |
| Hard, Thick Crust | Not Enough Steam | Ensure you are getting a huge burst of steam by using boiling water on the bottom rack. |
| No Large Holes (Tight Crumb) | Insufficient Hydration or Time | Increase water slightly (check flour protein); extend the bulk fermentation time. |
| Overly Sticky | Under-Developed Gluten | Increase the stretch and fold repetitions (e.g., four times instead of three) to build necessary strength. |
- Humor Note: Did you vigorously knead this dough? Shame on you! Ciabatta dough prefers gentle persuasion, not brute force. 😉
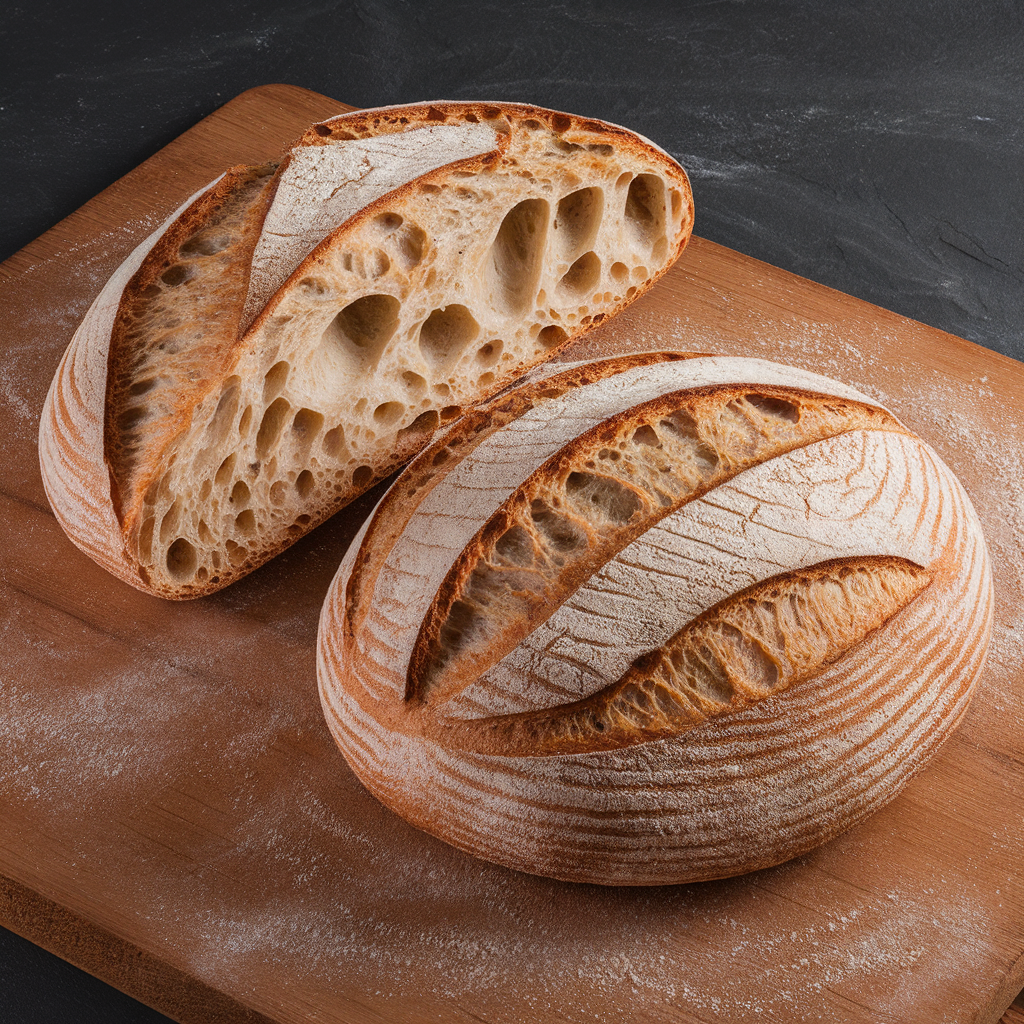
🥇 The Secret to the Holes: High Hydration and Gentleness
The large, irregular holes (the alveoli) in Italian Ciabatta are its defining feature.8 We achieve them by using high water content and handling the dough as little as possible.
H3: The Water’s Role
- Structure: High water content means the dough is slack and sticky.9 The gentle stretch and fold method is used to slowly coax the gluten into alignment without deflating the large gas pockets that form.10
- Steam: The high water content provides internal steam during the bake, which forces the gluten structure to expand rapidly, resulting in those beautiful, huge holes.
🍽️ Serving Suggestions: Soaking Up the Goodness
Italian Ciabatta Bread is perhaps the most versatile bread for Italian cooking.11 Its open crumb is perfect for capturing sauces and oils.
- Panini: The classic use! Slice the loaf lengthwise for perfect panini sandwiches.
- Oil Dipping: Serve fresh slices with a bowl of high-quality olive oil and a side of balsamic vinegar.
- Soup Companion: Perfect for soaking up the broth from a hearty Minestrone or Zuppa Toscana.12
- Bruschetta: Slice and toast for the ultimate bruschetta base.
📊 Nutritional Information (Per Serving)
This information is based on the full recipe yielding 2 loaves (16 servings). Ciabatta is a lean bread, relying on minimal ingredients.13 🥖🔥
| Nutrient | Amount (Per Slice) |
| Calories 🔥 | 110 kcal |
| Total Fat 🧈 | 0.5 g |
| Saturated Fat | 0.1 g |
| Sodium | 150 mg |
| Total Carbs | 22 g |
| Fiber | 1 g |
| Protein | 4 g |
🎉 Conclusion: The Triumph of the Slipper
You successfully navigated the sticky challenge of high hydration and mastered the technique for creating a perfect, light, and airy Italian Ciabatta Bread. You learned the secrets of the Biga, the gentle touch of the stretch and fold, and the absolute necessity of steam for that crisp crust. You now possess the secret to extraordinary Italian baking.
Remember the golden rule of Ciabatta: Fear the stickiness, but never the water! High hydration is your friend.
Now that you’ve mastered the slipper, are you slicing your loaf for a panini or dipping it straight into olive oil? 🎯