Let’s talk about those times you need a dish that screams sophistication but takes almost zero effort. Forget spending hours chopping and simmering! You want something fresh, punchy, and utterly gorgeous. I’m talking about Spicy Tuna Tataki with Ponzu Sauce.
This Japanese classic—seared tuna slices served with citrus soy—is perfect for a light appetizer or a fancy main course. My personal obsession started because I love the textural contrast: the crispy, peppery sear outside, and the cool, silken raw tuna inside. It looks incredibly impressive, making your guests think you spent hours slaving away. (Spoiler: you didn’t.) Ready to master this quick, flavorful, and incredibly healthy dish? Let’s get searing! 🍣
🐟 Part I: Selecting and Prepping the Star (The Tuna)
The success of Tuna Tataki rests entirely on the quality of your fish. Since the center remains raw, you cannot compromise here. This isn’t a recipe where “good enough” tuna works; you need the best.
The Essential Tuna Requirements
| Ingredient | Quantity | Notes |
| Sushi-Grade Tuna Loin | 450g (1 lb) | MUST be fresh, bright red, and certified sushi-grade. |
| Sesame Oil | 2 Tbsp | For searing and flavor. |
| Black Sesame Seeds | 2 Tbsp | For coating and contrast. |
| White Sesame Seeds | 2 Tbsp | For coating and crunch. |
| Black Pepper | 2 tsp | Freshly cracked is highly recommended. |
| Kosher Salt | 1 tsp | For seasoning the exterior. |
| Cayenne Pepper (Optional) | 1/2 tsp | For the “spicy” kick! |
H3: Sourcing Sushi-Grade: Don’t Risk It
I can’t stress this enough: only use tuna labeled “sushi-grade” or “sashimi-grade.” This means the fish was flash-frozen to destroy parasites, making it safe to consume raw. If your fishmonger gives you a questionable look, walk away.
- Color Check: Look for a piece that is vibrant, deep red. Avoid any tuna with brown edges or a dull, faded appearance. Tuna should look healthy and firm.
- A Personal Anecdote: Once, I tried to save five bucks on a piece that “looked okay.” I ended up with chewy, slightly metallic-tasting tataki. It was a disaster. You simply deserve better! IMO, paying a little extra for quality tuna is worth the investment.
- Shape Matters: Try to select a piece that forms a relatively uniform log or rectangle. This makes the searing and subsequent slicing much easier.
Prepping the Tuna Loin for its Close-Up
Before we sear, we build the spicy crust. This contrast between the crust and the cool interior is the whole point of tataki.
- Pat it Dry: Take your tuna loin and use paper towels to pat it completely dry. Excess moisture prevents a good crust from forming when it hits the hot pan.
- The Spice Rub: On a flat plate, mix the white sesame seeds, black sesame seeds, cracked black pepper, salt, and cayenne pepper (if using). If you skip the cayenne, it’s just Tuna Tataki, which is also great, but less exciting.
- Coat Thoroughly: Brush the tuna loin lightly with sesame oil. Then, roll the tuna log firmly in the seed/spice mixture until all sides are evenly coated. Don’t be shy; you want a thick, crunchy layer.
🔥 Part II: The Sear (Tataki Technique)
Tataki literally means “pounded” or “hit,” but in cooking, it refers to the quick searing of meat or fish. We want a dark, crispy sear on the exterior and an interior that stays perfectly cold and raw.
The Searing Process: Fast and Furious
- Heat the Pan: Place a cast-iron skillet or a heavy-bottomed frying pan over medium-high to high heat. You want the pan screaming hot before the fish touches it. Cast iron is great because it retains heat, ensuring an even sear.
- Add the Oil: Once the pan is hot (a drop of water should sizzle instantly and evaporate), add $1$ tablespoon of sesame oil. It should shimmer immediately.
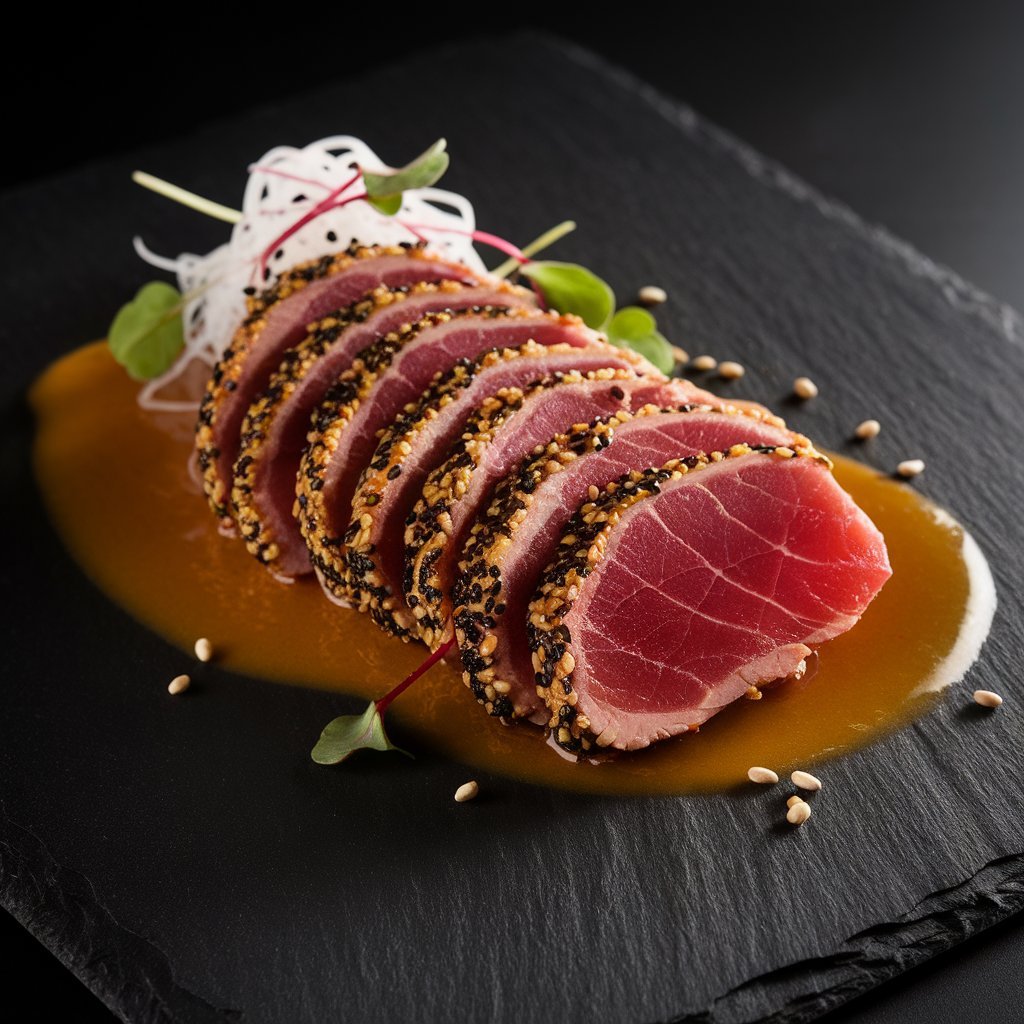
- The Sear: Gently place the coated tuna loin in the hot pan. Sear each side for about 30–60 seconds, max. Use tongs to turn the log, ensuring you sear all four main sides (and the ends, if possible). The goal is a thin, dark crust, about $1/8$ inch deep.
- Cool Down: Immediately remove the tuna from the pan and place it on a clean plate. Stick the tuna in the freezer for 5 minutes or the fridge for 15 minutes. Why? This stops the cooking process dead and firms the fish, making it easier to slice razor-thin later. This chill time is non-negotiable! ❄️
🍊 Part III: The Perfect Ponzu Sauce
You need a sauce that is tangy, savory, and light to complement the rich tuna. Enter Ponzu Sauce. It’s a simple blend of citrus and soy, and it’s miles better than just plain soy sauce.
Ingredients for Homemade Ponzu
Homemade is always better than bottled here, IMO, but you can certainly use a high-quality store-bought ponzu if you’re truly pressed for time.
| Ingredient | Quantity | Notes |
| Soy Sauce | 1/2 cup | Low-sodium preferred. |
| Lemon Juice | 2 Tbsp | Freshly squeezed. |
| Lime Juice | 1 Tbsp | Freshly squeezed. |
| Rice Vinegar | 2 Tbsp | Unseasoned. |
| Mirin (Sweet Rice Wine) | 1 Tbsp | Adds a touch of sweetness. |
| Dashi Powder (or Stock) | 1/2 tsp powder or 2 Tbsp stock | Adds umami depth. |
| Ginger | 1 tsp | Grated, for a little warmth. |
| Optional: Sriracha or Chili Garlic Sauce | 1/2 tsp to 1 tsp | For an extra Spicy Tataki kick! |
H3: Mixing for Maximum Flavor
This part is simple: you mix everything! But letting it sit really helps the flavors marry.
- Whisk It: In a small bowl, simply whisk together all the ponzu ingredients until the dashi powder is dissolved.
- Taste and Adjust: Taste the sauce. Do you want it tangier? Add more lime. Sweeter? A touch more mirin. For true spicy tuna tataki, I always add a tiny dollop of Sriracha right here. It gives the whole dish a seamless warmth.
- Marry the Flavors: Cover the ponzu and let it sit at room temperature for at least 15 minutes while the tuna chills. Ever wondered why sauces taste better after they sit? It gives the molecules time to mingle and deepen the overall profile. It’s flavor science! 🧪
🔪 Part IV: The Final Presentation
The tuna is cool, the ponzu is seasoned, and now we slice. How you slice the tataki determines how elegant your final dish looks.
Slicing and Plating Tataki
- The Sharp Knife: Use your sharpest knife for slicing. A good sashimi knife or a very sharp chef’s knife is non-negotiable. A dull knife will tear the soft tuna, ruining that beautiful contrast between the sear and the pink interior.
- Slice Thinly: Slice the chilled tuna loin against the grain into $1/4$-inch thick rounds. Angle your knife slightly to get a larger surface area on each slice. The slices should show a clear, vibrant pink center and a dark, crusted edge.
- The Layup: Arrange the slices on a platter, slightly overlapping them in a clean line or a fan shape. Presentation is key here!
- Garnish and Serve: Spoon a generous amount of the Ponzu Sauce over the tuna slices or pool it artfully on the plate beneath the slices. Garnish with something fresh: a sprinkle of finely sliced scallions (green onions), a few cilantro leaves, or even thin slices of jalapeño for extra spice.
🎯 Troubleshooting and Tataki Tips
Even simple recipes can have hiccups. We’re here to make sure your Spicy Tuna Tataki is flawless.
My Sear Isn’t Crispy Enough!
If your sear is gray and dull, your pan wasn’t hot enough.
- Tip 1: Next time, use a higher heat setting and ensure the oil is just starting to smoke before you add the fish.
- Tip 2: Did you pat the fish dry? Wet fish steams, so always remove all surface moisture before searing.
Is This Healthy? (The Nutritional Angle)
Yes! Tuna Tataki is an incredibly healthy, protein-packed option. You are consuming high-quality protein and Omega-3 fatty acids, and the cooking method uses minimal fat.
- We Win: We avoid heavy deep-frying, and the main fat source (sesame oil and natural tuna oil) is generally healthy. We use fresh citrus for flavor instead of heavy sauces. Win-win!
📊 Nutritional Information (Per Serving)
This recipe yields approximately 4 servings. These estimates are based on using lean tuna and low-sodium soy sauce.
| Component | Value | Unit |
| Calories | 220 🔥 | kcal |
| Protein | 35 | grams |
| Total Fat | 8 | grams |
| Omega-3s | High | |
| Carbohydrates | 5 | grams |
| Sodium | 650 | mg |
Note: Sodium count can vary widely depending on the type of soy sauce you use.
🎉 Conclusion: You’re a Tataki Pro Now!
You successfully navigated the world of Spicy Tuna Tataki with Ponzu Sauce! You sourced the perfect tuna, executed the crucial, high-heat sear, resisted the urge to slice it hot, and whisked together a brilliant ponzu. Give yourself a round of applause—you just created a dish worthy of a five-star restaurant in about ten minutes of active work.
The combination of the warm, spicy crust and the cool, delicate raw center, all brightened by the tangy citrus ponzu, is seriously addictive. Next time you host, don’t worry about the main course; people will just remember this appetizer. What’s your favorite garnish for a dish this fresh? I’m always open to new ideas!
Would you like me to suggest a great sake or Japanese beer to pair with this tataki?