Run a hand over a finished microcement wall and you’ll find no ridge where a tile edge should be. That one quality explains why microcement on bathroom walls keeps turning up in Dutch renovations. It’s a thin cement-based coating. Builders trowel it on in layers and seal the top. For an owner with a sound wall the appeal is real. For a tenant my verdict is mostly no, and the sums below explain why. They assume a bathroom of 180 by 240 cm with walls finished to 210 cm. A different room changes the totals, though the reasoning still holds.
Where the Jointless Wall Came From
Tiles earned their place by being hard and simple to clean. A glazed face sheds water, and each grout line gives the wall a little room to flex with the building. The joint was also the weak point. Grout holds on to soap film and darkens low on the wall. It needs a brush every few weeks, and every line is a ridge that a cloth catches on.
Cement finishes had long been used on floors and render. The step to a bathroom wall was a short one. Today’s version adds polymers, which let a layer of a few millimetres bond to a prepared surface and tolerate slight movement. That gives a wall with no joints, finished by hand on site, where a tile arrives finished from a factory.
Two things keep it spreading. A single colour lets a compact room feel like one volume. Microcement on bathroom walls in good condition can also mean less demolition than a full strip.
What Actually Changed With Microcement on Bathroom Walls
The change you can measure is thickness. Assume a porcelain tile of 10 mm on 3 mm of adhesive, which builds a wall out by 13 mm. A coating of about 3 mm builds it out by 3. Taken together, the build-up on every wall falls from 13 mm to 3 mm, a drop of 77 percent.
In our room the perimeter of 8.4 m at 210 cm high gives 17.64 m². The walls total 16.04 m² once the 80 by 200 cm door is taken out. At 13 mm the walls carry 208.5 litres of material, and at 3 mm they carry 48.1 litres. A tiled version in 30 by 60 cm pieces needs about 89 separate tiles, where the coating forms one continuous surface.
The thinner layer returns space. Each tiled wall takes 1.3 cm. The 180 cm width shrinks to 177.4 cm and the 240 cm length to 237.4 cm. With the coating they measure 179.4 cm and 239.4 cm. The clear floor area rises from 4.21 m² to 4.29 m². In a shower alcove 90 cm wide, the space between the side walls grows from 87.4 cm to 89.4 cm, which is two centimetres for your shoulders.
The job changes shape as well. Assume six passes, each left to dry before the next. A tiled wall needs fixing on one visit and grouting on another.
The tile job is quick but heavy, and the coating job is slow and light, which gives a mistake time to hide.
Who the Coating Suits, and Who It Doesn’t
It suits a wall that doesn’t move. Plaster or cement board in good condition and dry to the touch will carry 3 mm, while a wall with cracks will copy them. Trace any existing crack with a fingernail. A crack you can feel is likely to show again through a layer this thin. It usually returns in the same place.
It suits an owner who plans to stay. The finish is bonded to the wall. Taking it off means grinding or scraping back to the base, and the surface underneath may come away in places. That is why a tenant should read the tenancy agreement first. Most agreements ask for written permission before a fixed alteration, and a bonded coating is about as fixed as an alteration gets.
It suits dry walls best, which is why microcement on bathroom walls works above the splash zone. In our room a 90 cm alcove has three wet walls of 90 cm each. At 210 cm high they cover 5.67 m², which is 35 percent of the 16.04 m². Those walls need a complete waterproof system under the coating, laid by someone who has done it before.
It suits poorly where you want easy repairs. A scratch in a coloured, hand-trowelled coat is patched with a new coat. The patch seldom matches the trowel pattern around it.
Is Microcement Worth Putting on Bathroom Walls?
For a tenant the answer is usually no. A bonded coating can’t be handed back as it was found, and removing it costs the wall its surface. An owner has a better case, and a split works best. Keep the tile where water lands every day and put the coating on the 10.37 m² of dry wall, leaving the 5.67 m² alcove tiled. That moves 65 percent of the wall area to the jointless finish. If a dry wall is already tiled and sound, the tile can stay, because taking tile off is the biggest upheaval a bathroom can have. Tile stays in the alcove because a joint earns its keep there. It lets the wall move without a crack, and one failed tile can be replaced alone. Those dry walls are the ones you face from the door, so the finish does the most for the look where it risks the least.
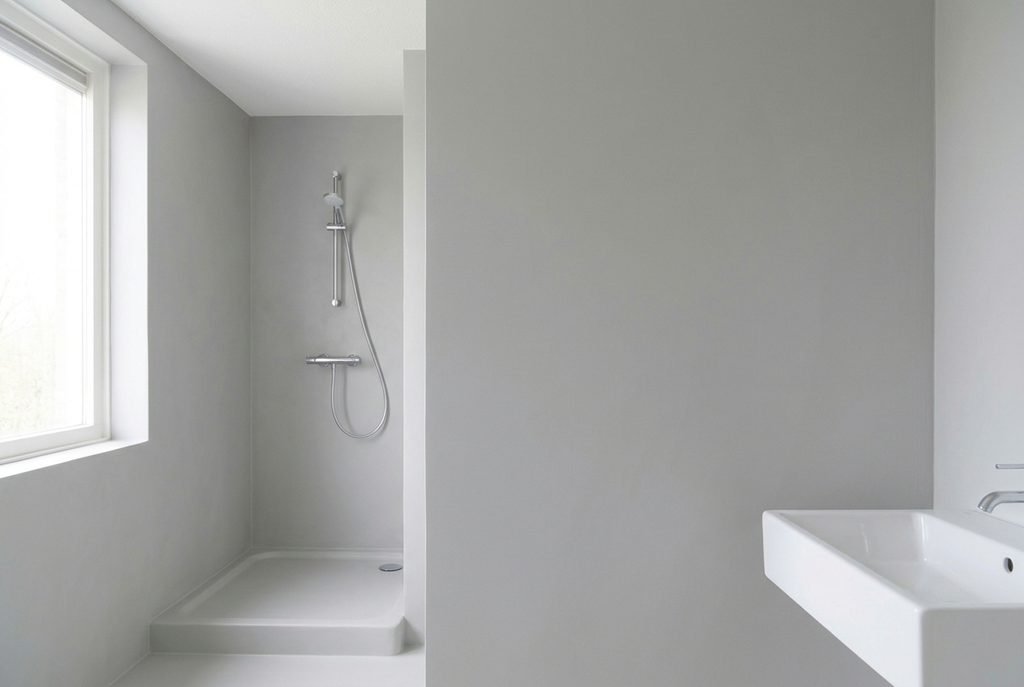
The Version That Will Date Fastest
The extreme version is one coating in one colour on every surface of the room, even the floor and the shower base, with no joint anywhere. You can spot it by three marks. The floor runs straight up the wall, the shower base has no visible edge and one tint covers every plane. Microcement on bathroom walls works because walls are the gentlest surface in a bathroom. The extreme version moves the finish onto the harshest ones.
A room like that asks the finish to do jobs it handles poorly. The floor takes grit and wet footfall, so the sealer wears first where feet land. Movement also needs somewhere to go. A tiled room hides it in grout, while a continuous coating needs cut joints at the corners, which bring back the lines you removed. Any repair on an all-over finish shows as a patch in the centre of one colour.
The moderate route coats the dry walls and leaves the floor and the alcove as they are.
How to Try It Without Committing
Ask whoever would do the work to coat a 30 cm square offcut of cement board and hang it in the bathroom for four weeks. Splash it when you shower and wipe it afterwards. Date the back of the board so the month stays honest. The offcut covers 0.09 m², which is 0.6 percent of the 16.04 m² of wall. It teaches you a lot for very little. After the month, look for water marks that don’t wipe away and for any shift in colour or sheen. If you’d accept those marks on every wall, you’re ready to book the work.
A tenant who likes the look can borrow the colour without the coating. With the landlord’s agreement, paint the dry wall above the tile line in the same grey and keep the tile below it. That isn’t the same surface, yet it takes an afternoon to undo. The trend is worth knowing about, and an owner with a dry, sound wall can follow it in part.
Questions Readers Keep Asking
Should I take my tiles off to get this look?
Keep sound tiles. Removing them is the heaviest job a bathroom can have, and the wall behind often needs repair before any coating will bond to it. Change them only when a full strip is planned anyway, or when the wall behind has cracked. A dry, bare wall is the easy place to start.
Does it suit a busy family bathroom?
On dry walls it can, because a wipe takes the place of scrubbing grout. In the shower zone and around the basin it needs a full waterproof system under the sealer. The sealer wears first where water and hands land. A household that wants no upkeep at all will be happier with tile there.
How long will it last?
The coating lasts only while the wall beneath it stays still, since movement shows up as cracks. The sealer is the part that wears, and it gets renewed from time to time. I can’t give a lifespan in years that would hold for every bathroom. Ask the applicator to put the expected care routine in writing.